The Art of Gentle Closure
Wound Closure Strips—commonly known by the brand name Steri-Strips™—are thin, adhesive, sterile tapes used to approximate the edges of small, shallow cuts and surgical incisions. Unlike sutures or staples that pierce the skin, these non-invasive strips adhere to the surface, acting as a mechanical bridge that holds wound edges together while the body's natural healing process unfolds beneath. They represent one of the most elegant and patient-friendly solutions in the modern wound closure armamentarium, offering speed, safety, and simplicity without the needle.
Fundamental Principles: How They Work
The underlying mechanism of wound closure strips is deceptively simple yet biomechanically sound.
Mechanical Approximation
When correctly applied perpendicularly (across) the wound, the strip transfers tension from the skin on one side to the other, effectively splinting the wound shut. The adhesive backing provides immediate, though temporary, tensile strength that supports the delicate fibrin network forming between the wound edges.
Tension Redistribution
Unlike sutures, which create discrete points of high tension, closure strips distribute approximating forces across a broad, continuous adhesive interface. This reduces focal tissue stress, minimizing the risk of the strip "cheese-wiring" through edematous or fragile skin.
Complementary Function
Strips are frequently used not as solo performers but in synergy with other methods: placed over sutures to reinforce the repair and permit earlier suture removal (reducing track marks), or combined with tissue adhesive for a hybrid closure.
Indications: When to Use (And When NOT To)
Ideal Candidates
Wound closure strips are appropriate for wounds that meet all the following criteria:
✅ Shallow depth: Bleeding stops after 5 minutes of firm pressure; no visible fat, muscle, or bone.
✅ Linear, clean edges: Non-jagged, amenable to precise edge approximation.
✅ Minimal tension: Edges can be easily pressed together with fingers or forceps without force.
✅ Dry, hairless surrounding skin: Essential for adhesive bond integrity.
✅ Low-mobility location: Areas not subjected to constant flexion or shearing.
✅ Immunocompetent host: Adequate healing capacity expected.
4.2 Absolute Contraindications
Do NOT use wound closure strips for:
❌ Active infection: Pus, erythema, warmth, or foul odor.
❌ Heavy exudate or uncontrolled bleeding: Moisture prevents adhesion.
❌ High-tension wounds: Edges gaping despite gentle manual approximation.
❌ Irregular, stellate, or macerated wound margins.
❌ Bite wounds (human or animal) or punctures from dirty/rusty objects.
❌ Hairy skin (unless hair is clipped; shaving may cause micro-abrasions and infection).
❌ Known allergy to acrylic adhesives.
Step-by-Step Application Technique
Proper technique is the single most important determinant of successful wound closure with strips.
Preparation Phase
Hand hygiene: Wash thoroughly with soap and water.
Wound cleansing: Irrigate with sterile saline or clean running water; gently cleanse peri wound skin with mild soap. Pat completely dry.
Hair management: If hair is dense, clip (do not shave) to improve adhesion without traumatizing follicles.
Skin preparation (optional but recommended): Apply a thin layer of tincture of benzoin or mastic gum adhesive to the skin adjacent to—never inside—the wound. Allow to become tacky (30–60 seconds). This dramatically increases strip tenacity.
Application Phase
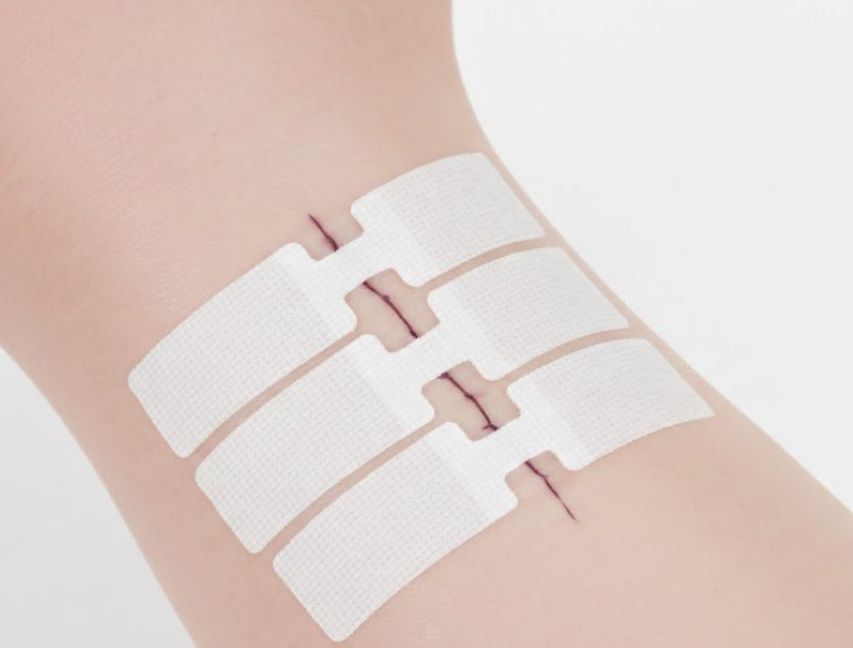
First strip placement: Identify the midpoint of the wound. Apply the first strip here—not at the top or bottom.
Half-strip technique: Firmly adhere one half of the strip to one side of the wound, stopping precisely at the wound edge. The other half remains elevated, not yet touching skin.
Edge approximation: Use your fingers or forceps to gently pinch the wound edges together. This is the critical step; the strip only maintains approximation—it cannot create it.
Seal the closure: While maintaining edge apposition, smoothly apply the second half of the strip to the opposite skin. Do not stretch the strip during application; this invites shear injury and blistering.
Subsequent strips: Add additional strips above and below the first, spaced approximately 3 mm (⅛ inch) apart. Continue until the entire wound length is securely closed.
Optional reinforcement: For enhanced security, apply one or two parallel "railroad track" strips approximately ½ inch (12 mm) from each end of the wound, running perpendicular to the primary strips. This creates a tic-tac-toe pattern that anchors the construct.
Visual Summary: The correctly applied strips should resemble a plus sign (+) across the wound center, with subsequent strips forming an equals sign (=) pattern.
Duration, Wear, and Removal
How Long Do They Stay On?
Typical wear time: 5 to 14 days, depending on wound location, moisture exposure, and skin activity.
Surgical wounds: Often left undisturbed for 7–14 days post-operatively.
Traumatic lacerations: Usually remain in place for 5–10 days.
Strips are designed to fall off naturally as the underlying epidermis regenerates and the adhesive bond weakens.
When to Remove Manually
If strips remain adherent beyond 14 days and show no signs of loosening, active removal is indicated. Prolonged retention may trap moisture and debris.
Proper Removal Technique: "Low and Slow"
Do not rip off wound closure strips like adhesive bandages. Improper removal can reopen the wound.
Remove any parallel "railroad track" reinforcements first.
Loosen one end of a perpendicular strip and gently peel it back toward the wound center.
Support the skin immediately ahead of the peel with your opposite index finger to prevent traction injury.
Pause when you reach the wound line. Do not peel across the wound.
Repeat from the opposite end, peeling toward the center.
Finally, gently lift the remaining central segment.
Never pull the strip away from the wound or in one continuous motion.
Alternative method (NHS guidance): Soak the strips in warm water (e.g., during a bath or shower) for 10 minutes to soften the adhesive, then gently peel.
Living with Wound Closure Strips: Patient Guidance
Showering and Hygiene
Yes, you can shower with wound closure strips.
Gentle cleansing: Mild soap and water; pat dry with a clean towel—do not rub.
Avoid soaking: Prolonged submersion (baths, swimming, hot tubs) weakens adhesive.
Surgical wounds: May require waiting 24–48 hours before getting wet; follow specific provider instructions.
Not waterproof: Treat them as water-resistant, not impermeable.
Activity Restrictions
Minimize movement of the affected body part. Excessive flexion or stretching will cause strips to detach prematurely.
No heavy lifting, contact sports, or vigorous exercise until strips are removed and wound is fully healed.
Edema control: Elevation and ice (if applicable) reduce swelling, which otherwise creates tension on the closure.
What Patients Should Watch For
Instruct patients to seek medical attention if they observe:
🚨 Infection signs: Increasing redness, warmth, swelling, pain, purulent drainage, foul odor, or fever.
🚨 Dehiscence: Wound edges separating; wound reopening.
🚨 Bleeding: Blood soaking through the strips.
🚨 Excessive skin irritation: Severe itching, rash, or blistering beneath the adhesive.
Advanced Innovations: The Next Generation
While traditional adhesive strips have served reliably for decades, cutting-edge research is redefining the possible.
The Sutureless, Battery-Free (SBF) Strip (Nature Communications, August 2025)
This experimental platform integrates three transformative technologies:
Shape-Memory Polymer (SMP) Core: A biocompatible polycaprolactone-based polyurethane that is pre-stretched during manufacturing. Upon gentle heating to 40°C (easily achieved with a warm compress), the strip actively contracts, pulling wound edges together uniformly without requiring manual approximation skill. Recovery ratio: 91% within 2 seconds.
Wet-Tissue Bioadhesive: A poly (acrylic acid)-NHS/PVA interpenetrating network that forms hydrogen bonds (immediate physical adhesion) followed by covalent amide linkages (durable chemical anchoring) with tissue amines. Adhesion toughness exceeds 200 J/m²—robust enough for dynamic surfaces.
Ultrasound-Driven Triboelectric Generator: External ultrasound (20 kHz, 0.5 W/cm²) vibrates a molybdenum foil electrode within the strip, converting mechanical energy into localized electrical stimulation. The system achieves skin-impedance matching (~50 kΩ), delivering fields up to 0.59 kV/m to the wound bed. This non-pharmacological electrotherapy enhances fibroblast proliferation, angiogenesis, and collagen deposition.
In vivo rat studies demonstrated a 61.7% reduction in scar area compared to conventional sutures, with superior epithelial regeneration .
Clinical Status: This remains a research prototype. It is not commercially available and should not be confused with conventional adhesive strips. However, it illuminates the future trajectory of wound closure: mechanically active, therapeutically engaged, and completely non-invasive.
The Indispensable Strip
Wound Closure Strips occupy a unique and irreplaceable niche in wound management. They are not a universal substitute for sutures; deep, gaping, or highly stressed wounds demand the robust tensile strength of needle and thread. However, for the vast landscape of small, clean, low-tension lacerations and surgical incisions, they offer an optimal balance of efficacy, safety, simplicity, and economy.
Their greatest virtue is perhaps what they avoid: needle anxiety in a child, suture marks on a face, a return visit for a working parent, or iatrogenic tearing in an aging patient. In an era of escalating healthcare complexity, the humble adhesive strip remains a testament to the power of doing more with less—a gentle, intelligent solution that lets the body heal itself with minimal interference, maximal support, and zero drama.
 |  |  |
 |  |  |